OPEN: MON - FRI 8AM - 5PM
Check our current lead time for Cut & Edge orders COLLECTIONS: 8AM - 4PM
Edgebanding is the process of fixing a strip of material to the cut edge of a furniture panel. It covers the exposed board and helps protect the edge from knocks and everyday moisture.
Published: 7th October 2026
A lasting finish depends on choosing edging that suits the board, bonding it properly and trimming it cleanly. The colour matters, but so do the thickness, glue and conditions in which the furniture will be used.
Some materials need extra care. Stiff edging, metal finishes and raised patterns can all affect how a panel is processed, while unsuitable cleaning products can damage the finished edge later.
Explore Cworkshop’s panel edgebanding service when planning the finish for your furniture panels.
Edgebanding covers the narrow, exposed side of a board. It is commonly used on cabinet doors, shelves, wardrobe panels, desks and drawer fronts.
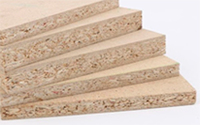
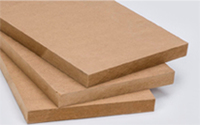
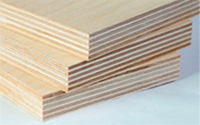
Cutting through medium-density fibreboard (MDF), chipboard or plywood exposes the material beneath the surface. On a decorative board, that cut edge usually looks different from the finished face. Edging covers it with a matching colour, wood grain or contrasting finish.
For example, melamine-faced chipboard has a decorative surface on its faces, but cutting it leaves the chipboard core visible. Edgebanding finishes that exposed edge and makes it easier to wipe clean.
The treatment depends on the project. Painted MDF can have its edges sealed and painted, while plywood may be left with its layers visible and suitably finished. A decorative edging strip is one way of finishing a panel, rather than a requirement for every board.
Edging also has limits. A thin strip does not provide the support a shelf needs, repair a weak board or make ordinary MDF waterproof.
Choose the edging around the panel’s finish, expected wear and how it will be fitted. Materials that look similar can behave differently during trimming, cleaning and everyday use.
| Edging material | Where it is commonly used | What to consider |
|---|---|---|
| ABS | Cabinet doors, shelves and decorative furniture panels | Available in many colours and textures. Thickness and corner shape affect the finished appearance. |
| PVC | Furniture panels and cabinet components | Another widely used plastic edging. Check the particular product's finish, processing and care instructions. |
| Polypropylene, often called PP | Cabinetry and interior furniture | A plastic edging that needs a suitable backing and adhesive. Confirm the available decor and the product's processing requirements. |
| Wood veneer | Panels with a real wood face | Gives a real wood edge. Grain and colour vary, and unfinished veneer needs a suitable finish. |
| Melamine | Thin decorative edging, including some iron-on products | A paper-based material treated with resin. Check whether the product is supplied with glue already applied. |
| Acrylic | Decorative edges, including gloss and glass-effect designs | Cleaner choice matters because unsuitable solvents can cause damage or cracking. |
| Aluminium or metal-faced edging | Decorative furniture details and contrasting edges | Identify whether it is solid metal, metal-faced plastic or a printed metal effect. Handling and trimming requirements differ. |
These are general material options. The edging available for a particular board depends on its colour, texture, dimensions and the supplier’s range.
ABS is a type of plastic used on many cabinet and shelving projects. It combines a decorative finish with resistance to everyday knocks. A smooth strip can still look out of place beside a deeply textured board, even if the colour is close.
Cworkshop offers 1 mm and 2 mm ABS edging options. The available finish should be checked against the chosen board and the shape you want at its corners.
Real wood edging helps the edge of a veneered panel sit naturally alongside its face. It may still differ slightly in grain and colour because both pieces come from natural timber.
Choose the edging and finish together when ordering veneered boards. An oil, stain or lacquer can change the colour, so compare a finished sample where the match is important.
Thin veneer only allows light sanding. If you need a deeper shaped edge, discuss a thicker wood edging or a separate solid timber strip before the panel is cut.
Paintable preparation tape can provide a smoother starting surface on an MDF edge and reduce the work needed to deal with loose fibres. Cworkshop offers this type of edge preparation.
Use the coating instructions for the actual tape. Some paintable products have a factory treatment that helps paint stick; sanding it away or wiping it with an unsuitable solvent can spoil that surface.
For edges that will be finished directly, our guide to sealing MDF edges explains the preparation involved. Do not apply a paint sealer beneath an edging strip unless it is approved for the bonding method.
Start with the board manufacturer’s colour or pattern reference, often called its decor code, and the surface finish. A description such as “white” or “oak” is rarely enough to identify a close match.
Check these details together:
View samples under the lighting where the furniture will be fitted. Two surfaces that look close in daylight may look different under warm room lighting. Cworkshop’s samples and swatches can help with the board selection.
A matching decor does not necessarily create a continuous grain pattern around a corner. If you want that effect, it needs to be discussed as a separate design detail.
Raised patterns need particular care where the edging meets the board face. Cleaf CHEOPE has a geometric, pyramid-like texture, so its surface cannot be treated in the same way as a flat panel.
Our operators can edgeband CHEOPE panels. The challenge is trimming the strip neatly alongside the raised surface without damaging the pattern or leaving an awkward lip.
This means checking the setup on the actual board. The raised surface affects where machine guides and trimming tools make contact, so the finished corner needs checking from different angles.
Edging thickness and edging width describe different measurements. Getting them mixed up can lead to ordering a strip that does not cover the board or a panel that finishes at the wrong size.
Thickness is how much material the edging adds beyond the cut edge. Width is the distance the strip covers across the thickness of the board.
A thinner strip gives a less prominent edge. A thicker strip allows a fuller rounded corner and can provide more material to absorb everyday knocks, but it also changes the look of the panel.
At Cworkshop, 1 mm ABS can be finished square or with a rounded edge. The 2 mm ABS option has a rounded finish. Confirm which option is available for your chosen decor.
A square finish suits a crisp outline. A rounded finish gives a softer edge to touch, which may be preferable on a frequently used shelf or furniture front.
The edging strip normally needs to be wider than the board so the overhang can be trimmed flush on both faces. An 18 mm board therefore does not automatically require an 18 mm-wide strip.
The allowance depends on the machine, tape and actual board thickness. Raised surfaces and panels made from several layers need particular attention, so confirm the tape width with the workshop.
Edging adds to a panel’s length or width wherever it is applied. That matters when the panel must fit an opening or maintain a gap beside another door.
As a simplified example, a panel that must finish 600 mm wide with 1 mm edging on both opposite sides would start with a 598 mm-wide board: 600 − 1 − 1 = 598 mm. This assumes each finished edge adds 1 mm; the workshop must account for any machining allowances and small variations in the materials.
Before ordering, confirm whether the cutting list asks for finished sizes or sizes before edging. Do not subtract the edging yourself if the ordering system already makes that allowance.
The bonding method affects how an edge performs around heat, moisture and daily use. It also needs to suit the edging material and the equipment applying it.
EVA is a hot-melt glue that sets as it cools. It is widely used for furniture edging and can give a reliable result when the product and application suit the job.
Heat resistance varies between adhesives. For furniture near appliances or other heat sources, the glue specification and installation conditions need checking rather than assuming every hot-melt glue behaves alike.
PUR is a reactive polyurethane glue. It grips as it cools, then continues to cure, or develop its final strength, through a reaction with moisture.
A suitable, fully cured PUR bond generally offers better resistance to heat and moisture than conventional EVA. Cworkshop uses PUR glue for its panel edgebanding service.
Allow the glue to reach the required strength before exposing the panel to demanding conditions or further finishing, especially coatings that contain solvents. Follow the adhesive maker’s guidance: there is no single curing time that covers every PUR product and workshop condition.
PUR edging does not make the entire panel waterproof. Water can still reach an unsuitable core through damage, holes, joints or untreated cuts. Our guide to MDF and water exposure explains why the board choice still matters.
Zero-joint systems use suitable edging with a special bonding layer on its back. A compatible machine activates that layer using laser, hot air or another specified heat source.
This can make the join between board and strip much less noticeable. As REHAU’s processing guidance explains, these systems need the correct edging and equipment.
A fine PUR glue line and a zero-joint process are different methods. Ask which process is being quoted if the appearance of the join is important to your design.
A well-finished edge starts with a clean, sound panel. Glue cannot correct a badly chipped face or make a damaged core hold together.
The main stages are:
Some plastic edging comes with a factory primer on its back to help the glue grip. That treatment needs to remain clean and compatible with the adhesive.
For repeated doors or shelves, a trial piece helps confirm the result before the full batch is processed. A tidy-looking edge alone does not prove that the bond is sound.
Stiff edging needs a process that holds it firmly against the panel while the bond forms. This becomes particularly important around curves, where the strip may try to spring back towards its original shape.
Material, thickness and temperature all affect how easily a strip bends. Check the manufacturer’s minimum curve radius before specifying a tight shape; changing the edging thickness or widening the curve may be necessary.
Our operators find some edging noticeably softer and easier to handle than others. That can help during processing, but softness alone does not tell you whether an edge will suit the finished furniture.
Do not try to make an unsuitable strip bend by applying uncontrolled heat. The decorative surface, backing or protective film may be damaged before the required shape is achieved.
Metal edging can be marked by grit, rough handling or unsuitable tools and cleaners. A scratch across a brushed or reflective surface may be particularly visible.
Solid aluminium, plastic with a real metal face and printed metallic edging require different treatment. Ostermann’s aluminium guidance gives specific processing requirements for its solid aluminium products, showing why settings for ordinary plastic tape should not simply be reused.
Keep contact surfaces clean and protect finished components when stacking or moving them. Protective film helps, but it does not make the surface scratch-proof.
Protective film helps keep sensitive edging clean and reduces the risk of surface marks during processing and handling. It is often useful on metal, gloss and other easily marked finishes.
Our operators normally remove the film after the edging has been applied, helping keep the surface protected through that work. They have also encountered film that softens or melts during processing.
The film must withstand the heat, pressure and rubbing involved. Polifilm’s guidance on edging films explains why the film needs to be matched to the surface and the way it will be processed.
If film softens, wrinkles or starts leaving residue, stop and check the film specification and machine setup. Residue can create extra cleaning work, while damaged film may leave the surface exposed to marks. Test any change on a spare piece before continuing.
Removal timing depends on the product. Some films remain in place through later handling, while others need removing at a specified stage. Follow the supplier’s instructions, remove the film within its stated limits and inspect the exposed finish afterwards.
Use the recommended removal method rather than digging at the edge with a blade. The film is temporary protection; it is not a permanent coating for the furniture.
Edgebanding can peel because the original bond was weak, the board has been damaged, or later conditions have exceeded what the materials can withstand. The location and appearance of the failure help identify what needs checking.
Too little adhesive can leave areas without a proper bond. An uneven coating can produce weak spots even when most of the strip appears secure.
More glue is not automatically better. Excess adhesive can squeeze onto the faces, leave a more visible line and increase cleaning work.
The correct amount depends on the glue, board, edging and machine speed. It should follow the adhesive maker’s guidance and be confirmed through processing checks.
Cold boards and edging can cool hot-melt adhesive before it has bonded properly. Draughts, an unsuitable feed speed or insufficient pressure can have a similar effect on the finished joint.
Materials should be stored and brought to the processing conditions specified by their manufacturers. Raising the machine temperature alone may not solve a cold-board problem.
Room humidity can affect bonding, but the cause depends on the adhesive. PUR needs moisture to cure, so conditions outside the product’s recommended range can change how it develops its final strength. Damp boards or condensation need resolving before edging.
Control the workshop conditions and check the materials as well as the glue. For example, Ostermann’s PUR adhesive guidance states that curing depends on temperature and humidity. Use the instructions for the particular adhesive being applied.
Repeated wetting can damage the board beneath the edging. Once that core swells or breaks down, the strip no longer has the same sound surface to hold onto.
Pay attention to edges near sinks, dishwashers and other appliances. Follow the appliance instructions for ventilation, clearances and any required protective parts, and wipe up water rather than leaving it against the join.
Dust, grease, wax or an unsuitable coating on a bonding surface can interfere with adhesion. The back of the edging and the prepared board edge both need the condition required by the glue system.
Later exposure to an unsuitable cleaner can also damage the edging or its finish. Investigate the product used instead of assuming that every lifting strip needs a stronger glue.
Surface marks and poor trimming need a different response from a failing bond. These checks help narrow down the cause without treating every defect as peeling.
| What you notice | What may be happening | What to check |
|---|---|---|
| A gap between strip and board | Incomplete contact, poor glue coverage or an uneven edge | Bonding conditions, panel preparation and pressure settings |
| A pale line on a dark rounded edge | The plastic has become lighter during machining, sometimes called stress whitening | Trimming and scraping settings; do not assume the line is exposed glue |
| Regular ridges along the edge | Marks left by the cutting tools | Tool condition and the balance between machine speed and cutting speed |
| Chips beside the edging | Damage to the board face during cutting or trimming | Sawing, tool setup and panel support |
| Scratches, dull areas or shiny patches | Contact damage or unsuitable cleaning | Handling, protective film and cleaner compatibility |
| A lip where edging meets the face | Excess material or a trimming setup that does not suit the surface | Actual panel thickness, raised texture and the agreed edge profile |
Check the first finished component before repeating the same setup across a full order. The appropriate correction depends on the material and machine, so avoid copying a setting from an unrelated job.
Glue residue, dust and chips can affect the finish as panels pass through a machine. Build-up on contact surfaces can leave marks, while dirty cutting and finishing areas make consistent results harder to maintain.
At Cworkshop, our operators clean glue residues from the edgebanding machines every Friday. Their routine includes waxing relevant machine surfaces to help with glue release and removal.
Regular cleaning removes old glue before thick, hard deposits build up. Cleaning and waxing must follow the machine instructions, with suitable products kept away from surfaces that need to bond.
A weekly routine also needs the cleaning required during production and at shutdown. PUR glue pots and applicators need their own maintenance procedure because the adhesive continues to cure. Waxing other machine surfaces is a separate task.
Machine cleaners and release products have specific jobs. A chemical used to remove glue from equipment should not be assumed suitable for cleaning a finished cabinet door.
Use the care instructions for both the board face and the edging. A product that suits the main panel may not suit an acrylic, metal or painted edge beside it.
For routine cleaning, where the surface instructions allow it:
Avoid abrasive pads, blades and strong rubbing on sensitive finishes. Move kettles and other sources of concentrated steam away from vulnerable furniture edges, and do not leave wet cloths hanging over doors.
Some Panel Wipe products can damage edging or its surface finish, so they should not be used as general furniture cleaners without confirmed compatibility.
“Panel Wipe” is not one fixed chemical formula. Products sold under that description include solvent-based and water-based degreasers, often intended for preparing surfaces before painting.
The type of edging matters. For example, REHAU’s acrylic edging instructions warn against cleaners containing alcohol or solvents because of the risk of cracking. A cleaner being suitable for one plastic does not make it suitable for another.
Our operators have also identified unsuitable customer cleaning products as a possible cause of edging damage or peeling. The effect depends on the cleaner, surface and adhesive, so the exact product needs checking if a problem appears after cleaning.
Check the exact cleaner with the furniture or material supplier. If glue residue remains after installation, ask for an approved removal method. Testing an approved cleaner on a spare offcut is useful; an immediate lack of visible damage is not proof that an unapproved chemical is safe.
Repair is more likely to succeed when the board underneath is dry, firm and undamaged. If the core has swollen or crumbled, gluing the strip back down will not restore the original panel.
Identify the edging and adhesive before attempting a repair. Some pre-glued iron-on products can be reheated in line with their instructions, but that method should not be assumed suitable for factory-applied PUR or zero-joint edging.
For a valuable door or visible furniture panel, have the loose edge assessed before pulling it away. Removal can damage the face, and replacing the strip may involve trimming the board, which changes its finished dimensions.
Correct the underlying problem as part of the repair. A leaking fitting, repeated steam exposure or unsuitable cleaner can damage a replacement edge too.
Check the edging supply before committing to a board, especially for an unusual colour, thickness or raised texture. Finding a suitable match is only part of the decision; the required width and quantity also need to be available.
Roll sizes and minimum orders can make a small project awkward. A few visible edges may require much less material than the supplier’s standard roll, particularly with special-order products.
However, full rolls are not always compulsory. Hranipex’s ordering guidance says its standard ABS collection can be ordered from 1 metre, while melamine, veneer and non-standard edging require full rolls. Ostermann also offers selected edging by the metre and can cut suitable tapes to a requested width.
Ask about the exact decor, thickness and width. Short lengths or custom widths may involve additional charges or preparation time, and an option available for ABS may not apply to a veneer or metal product.
When calculating the amount needed, add the lengths of the edges to be covered, then allow for trimming, setup pieces and any damaged sections. Buying exactly the visible finished length leaves no material for these allowances.
Keep spare rolls clean, protected from sunlight and stored in the position recommended by the supplier. Retain the product label so a later order can be checked against the original edging.
Compare quotes for the same board, edged sides, tape thickness and corner finish. The cost can change with the total edge length, number of components and preparation needed for unusual materials.
For a small project, include unused roll material, tools and your trimming time when comparing loose edging with a cut-and-edge order. The price per metre alone does not show the full cost of preparing the panels.
Cworkshop uses edging from Hranipex, Ostermann and REHAU. The choice depends on the match and how the particular product works with the panel and process.
For the edging we regularly use, our operators have found Hranipex gives us the best balance of quality, price and ease of handling. They find those products softer to work with than some alternatives.
That is our workshop experience with the products we use. For your project, the useful comparison is the exact edging: its colour match, surface, available sizes and suitability for the application.
Ordering panels with their required edges finished can reduce the cutting, trimming and glue clean-up needed in your own workshop. The cutting list must describe the finished component clearly.
Include:
Think about the assembled furniture when marking edges. A shelf front may be obvious, but its ends may also be visible on an open shelving unit. Edges that will be glued to another component need to suit that joint design.
Discuss shaped work and drilling through our CNC cutting service where required. Cutting a new notch after edging exposes the core again, so plan how any later cuts will be finished.
You will still need to assemble and fit the furniture, and protect any fresh cuts made during installation.
Use Cworkshop’s panels cut-to-size service once your dimensions, edging and machining details are confirmed.
Cworkshop combines panel cutting with PUR edgebanding, helping you prepare matching components for cabinets, shelving and other furniture.
Our operators work with different edging materials and demanding surfaces, including Cleaf CHEOPE. Their experience with those boards helps us assess the edging and corner finish needed for the job.
If your project includes a raised pattern, metal finish or unusual panel detail, contact Cworkshop with the board reference and drawing before ordering. Confirming the detail early helps avoid a mismatch between the design and the supplied components.
A durable edge depends on a suitable strip, a sound board and a properly formed bond. The visible finish also depends on matching the texture, choosing the corner shape and protecting the surface during handling and cleaning.
Specify those details before cutting, particularly with raised patterns or unusual finishes. This gives the workshop the information needed to prepare components that suit your furniture design.
Explore Cworkshop’s edgebanding options to plan the finished edges for your next project.