OPEN: MON - FRI 8AM - 5PM
Check our current lead time for Cut & Edge orders COLLECTIONS: 8AM - 4PM
Cworkshop's How To
To prime and paint MDF, prepare the faces, seal the absorbent cut edges and apply a primer suitable for the board and your chosen paint. Once the primer is ready, smooth any raised fibres, remove the dust and apply the finishing coats at the specified intervals.
Updated: 21st September 2026
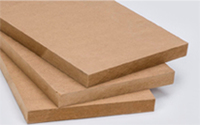
Medium-density fibreboard (MDF) can produce a smooth painted finish on shelves, cabinet doors and fitted furniture. The difficulty is making the cut edges look as even as the factory faces. More topcoat will not reliably hide an edge that was rough or poorly prepared underneath.
Prepare the faces and edges as one finishing job, using compatible products throughout.
Explore Cworkshop’s MDF boards to choose material for your painted furniture or panelling.
Getting started with painting MDF.
Bare MDF normally needs a suitable primer before decorative paint. The primer helps control absorption and creates a base for the topcoat, with exposed edges often requiring more attention than the smooth faces.
A combined primer and undercoat may carry out both preparation stages. If your paint claims to work directly on MDF, check that its instructions explicitly cover bare MDF and explain how to prepare the edges.
Factory-primed MDF is different. Its faces may already have a suitable base, but cut edges, drilled areas, repairs and any sanded-through patches still need attention. Check the factory coating’s preparation and topcoat requirements before adding another primer indiscriminately.
For new, bare MDF indoors, a water-based primer specifically approved for MDF is a practical starting point. Choose it as part of a compatible paint system, with instructions covering the board, your applicator and the intended topcoat.
The best MDF primer for your project depends on the surface: new panels, stained areas and previously painted cupboards may need different treatment.
| Surface condition | Primer choice to consider | What to check |
|---|---|---|
| Clean, bare MDF | An MDF primer or MDF-compatible primer-sealer | Whether it prepares both the faces and cut edges |
| Absorbent or fibrous edges | A compatible edge sealer or additional primer preparation | Whether a separate primer is needed afterwards |
| Stains that could show through | A stain-blocking primer approved for the surface | The preparation and drying instructions for that stain |
| Sound existing paint | A compatible primer where the repainting system requires one | Cleaning, adhesion and any abrasion needed |
| Factory-primed MDF | The supplier's specified finishing system | Treatment of cut edges, repairs and exposed patches |
Zinsser B-I-N AQUA is one water-based primer-sealer whose manufacturer lists MDF as a suitable surface. It is an example to check against your project requirements, rather than a reason to assume every water-based primer will behave the same way.
Shellac-based or other solvent-based primers can be useful where a compatible system calls for stain blocking or specialist preparation. Their suitability depends on the product and substrate; solvent-based does not automatically mean better for MDF. Follow the specified ventilation and cleaning requirements.
Also distinguish sealing from priming. A clear edge sealer may reduce absorption without replacing the pigmented primer or undercoat required by the finishing system.
You will generally need:
An MDF-compatible primer, with a separate sealer or undercoat if required.
A compatible topcoat suitable for the finished item.
Paintable filler suitable for the repairs.
Abrasive paper, a sanding block and suitable supports.
A brush and fine-finish roller recommended for the chosen coatings.
Clean trays, masking tape, protective sheets and lint-free cloths.
Suitable dust extraction, a wood-dust vacuum and protective equipment.
Use extraction when sanding and appropriate respiratory protection where needed. Clean up with a suitable vacuum rather than dry sweeping or blowing the dust away. HSE recommends at least Class M industrial vacuum equipment for wood-dust cleanup. Follow the coating’s ventilation and protective-equipment instructions as well. HSE wood-dust guidance.
Ensure that you have a clear, well ventilated and dust-free workspace. If you are painting MDF furniture that has already been made up, you can disassemble it and paint each piece separately or paint the piece of furniture as is. If you are going to paint your already-built furniture, and if possible, elevate the furniture so that you can paint it quickly and avoid messy bottom edges.
For built-in furniture, you may have some small gaps between the furniture and the wall; use caulk to fill in these gaps so that it looks neat. If you're painting built-in furniture on top of carpet or hardwood floors, try to place your masking tape under the furniture to avoid paint leakage onto it.
You can seal MDF edges with preparation tape. Due to the way MDF is made, exposed edges tend to absorb paint much more than the surface, so you will need to apply an extra coat or two of water-based primer on the edges. Preparation tape stops the paint from being absorbed by the MDF and acts as a primer, saving you time and effort.
Step 1:
Complete cutting, routing and drilling before finishing wherever practical. Each later cut exposes fresh MDF that needs preparing again. Our guide to cutting MDF covers that stage in more detail.
Dry-fit the components and check clearances before coating. Trimming a finished panel means preparing the fresh edge again.
Separate doors and shelves are often easier to coat evenly. Decide which joints will need filling after assembly and which areas need final preparation in place.
Keep intended glue surfaces free of paint unless the adhesive instructions allow bonding to the coating. Plan how to reach the required faces and edges without resting wet paint on the bench.
The MDF grade must suit the environment before painting begins. Standard MDF is for dry interior use; moisture-resistant MDF still needs suitable detailing and is not waterproof. Painting does not turn an unsuitable board into a suitable one.
Step 2:
Start with a dry, sound panel. Check the faces and edges under light falling across the surface to reveal dents and machining marks.
Fill defects and fixing holes with suitable paintable filler, let it harden and sand the repairs flush. Paintable caulk is useful for suitable gaps against a wall; use filler for repairs that need sanding level on a flat face.
Factory faces usually need controlled preparation, not heavy sanding. Smooth the defects without removing unnecessary material or rounding the panel’s corners. For light bare-MDF preparation, P180–P240 is a useful starting range, subject to the board condition and coating instructions. Use coarser paper only where the defect requires it, then remove the coarse scratches before priming.
On straight edges, a flat sanding block helps maintain the shape. On routed details, use a sanding support that follows the profile without flattening it.
Vacuum the panel and work area. Clean greasy existing paint as the coating instructions require, without soaking exposed MDF or leaving residue. Let the surface dry before coating.
Step 3:
Prepare every cut edge that will receive paint, including shelf fronts, door edges and routed openings.
Use a compatible MDF edge sealer or primer-sealer. A primer that also seals MDF may remove the need for a separate product.
Apply the treatment evenly, allow it to dry as instructed and lightly smooth any raised fibres. Remove the dust and repeat where the surface or product instructions require it. The edge should be sound and smooth before the topcoat is applied.
For suitable straight edges, paintable preparation tape provides another option. Choose that treatment before ordering and confirm the finished dimensions and coating requirements.
Our guide to sealing MDF edges properly explains the edge preparation in more detail.
Step 4:
Stir the primer and apply it at the coverage and thickness specified for the product. Use a suitable brush for edges and details, and a compatible roller for broad faces.
Work across a manageable area with even pressure. Keep the application consistent and check the adjoining edges for runs before the coating begins to set.
A patch that absorbs primer quickly should be inspected after the coat dries, rather than repeatedly brushed as it sets. Apply further treatment where needed.
Do not thin the primer simply to make it spread further. Only dilute it where the manufacturer specifies the amount and method for your application.
Prime exposed repairs and include any separate undercoat required by the system.
Step 5:
Touch-dry, ready to sand and ready to recoat are different stages. Follow the stated interval for the work you are about to do, allowing for temperature, humidity and coating thickness.
For example, Zinsser lists B-I-N AQUA as touch-dry in 25 minutes and recoatable in 45 minutes, with longer drying requirements for certain stains. Those figures belong to that product and should not be applied to every MDF primer.
Once the primer is ready, sand lightly where needed to remove raised fibres and small nibs. Fine paper around P240–P320 can be a starting point for dry primer, but use the grade specified for the actual coating. Take care around corners, where it is easy to expose bare MDF.
If the coating smears or rapidly clogs the abrasive, stop and check whether it needs more drying time. Remove the sanding dust and reprime exposed patches before continuing.
Inspect the face-to-edge transition as well as the broad surface. A ridge of primer along a shelf front can remain visible through the final paint.
Step 6:
Apply the topcoat evenly over the prepared surface, following the paint’s coverage and recoating instructions. A controlled coat is easier to level than a heavy application that collects on edges or in corners.
Use a suitable fine-finish roller on broad panels and a brush for recesses. Remove excess paint from the applicator before starting.
Work towards a wet edge and avoid repeatedly rolling or brushing paint that has begun to set. If the paint instructions recommend laying off with a brush, do it while the coating is still workable.
Check the underside of shelf fronts and the lower edges of doors for runs. Correct them while the paint is workable; once it has set, let it dry before levelling the defect.
Follow the specified coat count and inspect for even coverage. Correct dust, rough filler and edge defects before adding any further coats.
Sand between topcoats only where the paint instructions or defects require it. Avoid using coarse paper on an otherwise smooth finish.
Step 7:
Paint that feels dry may still be soft. Follow the handling and curing guidance before reassembly, loading shelves or cleaning the finish.
Keep freshly painted components supported with air able to circulate. Stacking them too soon or closing painted doors tightly against a frame can mark the finish or make the surfaces stick.
Refit handles and hinges carefully once the coating is ready. Check that paint build-up has not affected the planned clearances.
Cworkshop supplies MDF boards, including primed options, alongside cutting and panel edgebanding services. These can be specified around the parts you intend to paint yourself.
If you would prefer factory preparation, our spray painting service offers white primer and colour finishes. Confirm the preparation needed for your chosen hand-applied topcoat when ordering primed panels.
The spray service applies to panels cut by Cworkshop. Only edgebanded edges are sprayed, with raw edges left unfinished, so include visible edges and any later site cuts in the finishing plan.
Painting furniture can be time-consuming, messy and requires an impeccable attention to detail. Consider our spray painting service so that you have one less thing to worry about.